Create/Edit Inventory Item
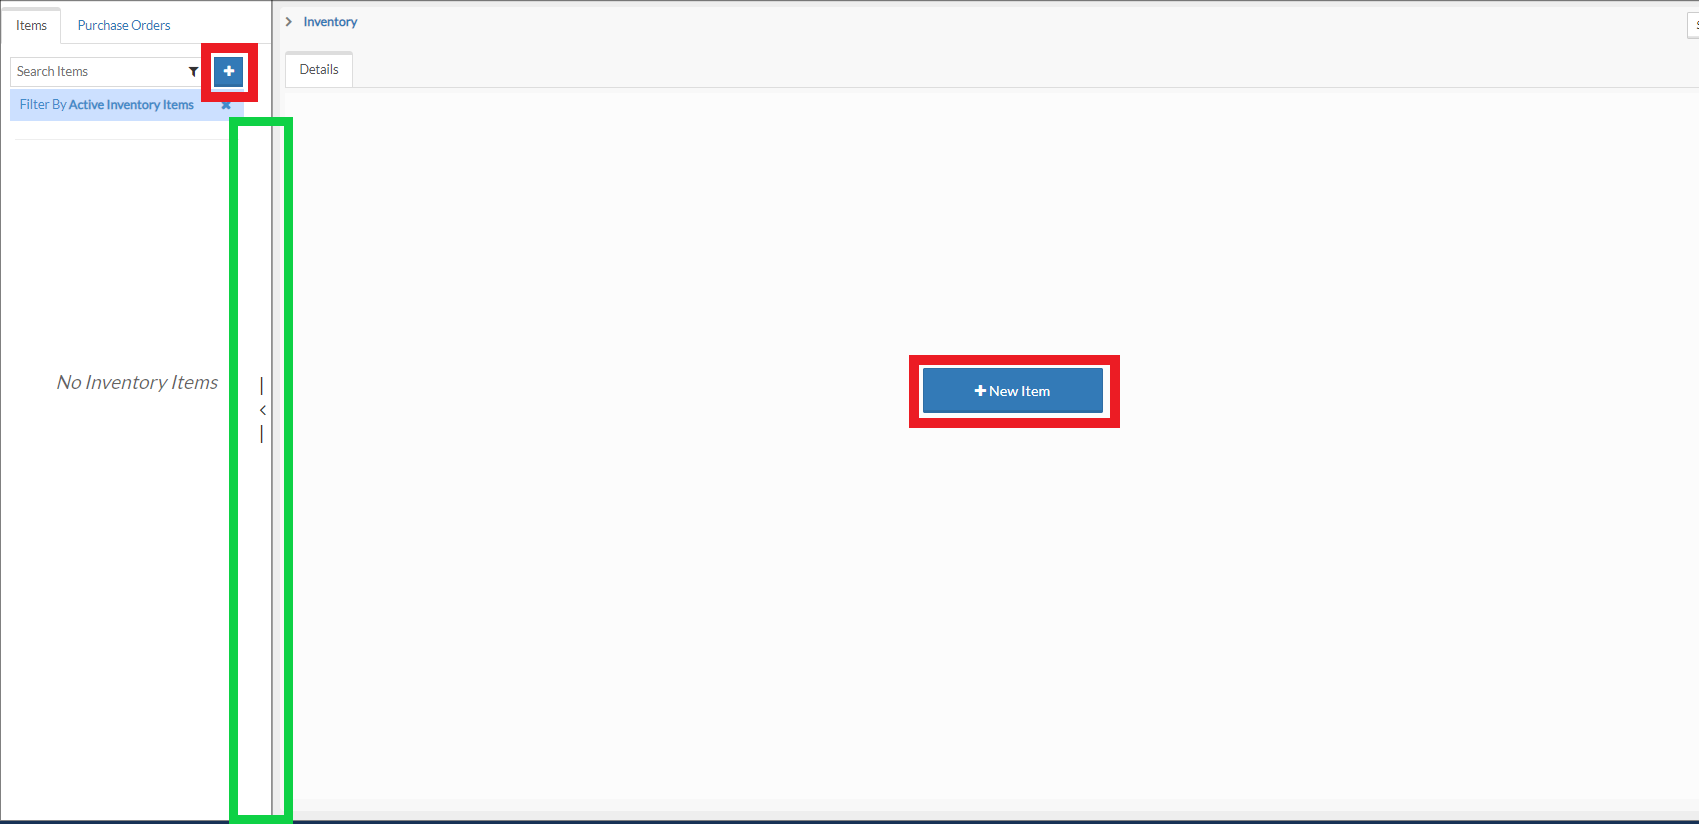
Creating an inventory item will allow you to monitor it's usage so you know when additional items will need to be re-ordered. To begin you will need to be in the INVENTORY panel which is located in SETTINGS > INVENTORY. If it is your first time on the panel then you can click the + NEW ITEM button in the middle of the screen. [red] Otherwise, hit the + button by the search field on the side panel. [red]
Tip: Note that the left panel is collapsible. Open and close by clicking the vertical bar highlighted in the image. [green]

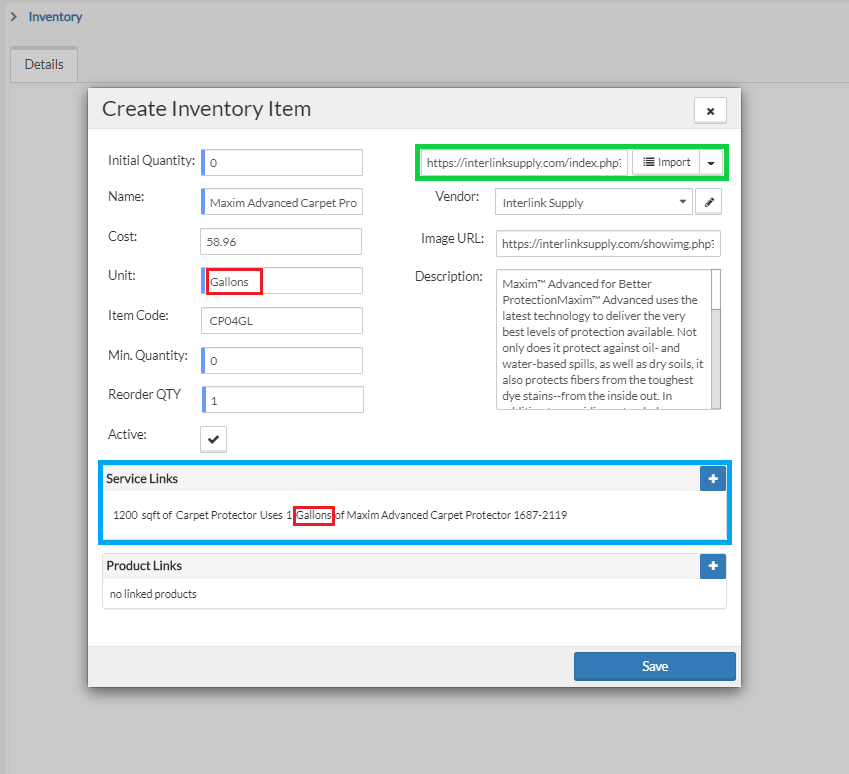
After selecting the + NEW ITEM button a screen will pop up titled "Create Inventory Item." From here we will need to fill out information on what the item is.
Tip: items marked in red are required to fill in before saving.

To manually create an item follow these steps to fill in the various fields:
- NAME = Name of the item. Be sure to name it something that will be easily identifiable later.
- INITIAL QUANTITY = How many units of this item are currently on hand.
- COST = How much does one unit cost for this item. This will help you build accurate purchase orders later.
- UNIT = What kind of unit are we measuring. Some examples to help: "unit" or "oz" or "bottles" or "gallons." Just make sure it is easy to measure and is easily understood throughout your team. Highlighted in red below.
- ITEM CODE= Typically used if importing a vendor URL item (see below). This is a searchable field though so if you want to create your own code to group items together for easy search-ability.
- MIN QUANTITY = This is the quantity that will indicate when a purchase order needs to be created to replenish the item. There are two things to note when selecting this number:
- How often the item is used. If you have an item that gets used in a matter of days you would want to make sure you always have a safe buffer of on-hand inventory and would have a larger Min Quantity.
- How long the item takes to ship. If an item has two day shipping vs two week shipping you will need to plan accordingly to make sure you aren't stuck waiting for a shipment to arrive. Longer shipping time = larger Min Quantity.
- REORDER QTY = How many units will need to be purchased when reordering.
- ACTIVE = Marking the inventory item as active/inactive
- IMPORTED ITEM URL = See below
- VENDOR = Use the edit button to add vendors you utilize to the list. Then select the vendor the item is purchased from in the drop down list.
- IMAGE URL = Add an image to the item for better description.
- DESCRIPTION = Add a description to the item for better description
- PRODUCT/SERVICE LINKS= create a link with your products and services by clicking the + button. Creating this link allows you to track the item's usage and know when inventory is low When creating the link, you will be creating a relationship where "x" amount of units of "Service Line 1" will use "y" amount of units of this inventory item. For example, let's say I have a carpet protector line item which covers 1200 sq ft per gallon of protector. The link itself would say "1200 units of Carpet Protector uses 1 unit (in this case gallon) of inventory item. (highlighted in blue below) Note: Be sure to have a unit selected for your line item to accurately track. Click here for more info on how to create/edit your line items.
- Click SAVE.
If you use Interlink Supply as one of your vendors then be sure to look here for a quick and easy shortcut for create inventory items! To import an item from Interlink Supply and automatically pull in all of the above info follow these instructions:
Note: Additional vendors will be added to this list in the future.
- Find the item you wish to track on www.interlinksupply.com.
- Copy the URL by highlighting the entire URL and either right-clicking and selecting copy or using the keyboard shortcut ctrl + c (command + c for mac users).
- Create a new inventory item (see above for further detail)
- Paste it into the IMPORTED ITEM URL section by either right clicking within the field and selecting paste or using the keyboard shortcut ctrl + v (command + v for mac users). [green]
- Click the IMPORT button and select Interlink Supply. [green]
- Wait a few seconds for the sync to complete.
- Update INITIAL QUANTITY, UNITS, MIN. QUANTITY, and REORDER QTY fields based on your needs. (see above section for further detail)
- Create PRODUCT/SERVICE LINKS. (see above for further detail) [blue]
- Click SAVE.

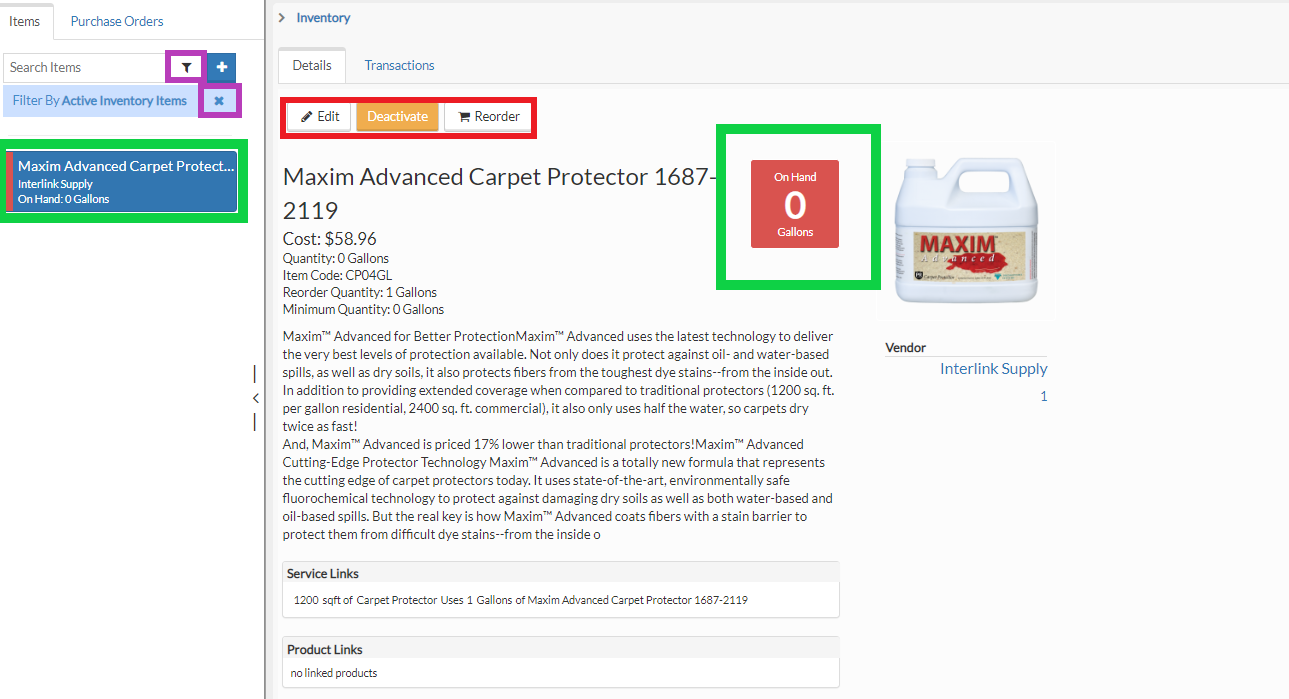
Now that we have our item created you will see the inventory item listed on the left hand side. [green] As your list grows you can use the filters or the search bar to quickly find the items you need.
Tip: To filter items click the FILTER icon and to remove a filter click the "x" next to the FILTER. [purple]
Once you click an inventory item to select it, you will see the full description of the item on the right. [green]Clicking EDIT allows you to make changes just as if you are creating the item. [red]If you are at or below the minimum quantity you selected when making the item, your on hand units will show in red. This is an indicator that you need to reorder more of that item and create a purchase order (or one will automatically trigger to create for you. [green]

